In which things start to go back together. And come apart again… Frank Westworth understands that patience is a virtue indeed…
Do you suffer from feelings of both incredulity and inadequacy when you read most restoration features? I do, and I’m hardly ashamed at all to admit it. I must have read several hundred tales over the years in which some top chap simply waves a magic spanner at a pile of rusting scrap and lo! somehow another rarity is back on the road.

To be fair, I have occasionally accomplished rebuilds like that myself, but most of my restorations – real life rising-from-the-wreckage stuff – take much longer than that. Where do folk find the time? And the skill? And the patience? You notice that I didn’t even mention … money.
Enjoy more RealClassic Magazine reading every month.
Click here to subscribe & save.
Whatever, after only a couple of years spent gazing with mounting frustration at my alleged Ariel Huntmaster – or rather at the piles of bits which constituted most of said Ariel — the time had finally arrived to start putting it all back together. This is my favourite time. I really enjoy building bikes. In fact, I really enjoy the voyage of discovery which dismantling them provides, but the period between the two processes is just too frustrating for words. Hunting for parts is all very well, but it’s both wallet-bashing and time-consuming.
One really good thing about rebuilding an Ariel, as opposed to, say, a BSA, is that although spares can be both scarce and expensive they usually fit. And their quality is usually good. Rowena and I spent several small fortunes resurrecting a BSA B25SS – and about 25% of the new parts we bought, mostly from reputable sources, didn’t fit. Or didn’t work if they did fit. So far, almost everything I’ve purchased in at least two years of jumbling and postal adventuring both fits and works. But not all. I’ll come back to that later…
It was becoming clear that my thinking about the toasted Huntmaster needed to change. As I’ve said in the earlier 450 instalments, the fire damage was far, far worse than I had expected. There was in fact no hope of performing the largely cosmetic and reconditioning exercise I’d anticipated.
But at least the frame was now sat on its own stand and front wheel on the bench, so reassembly was finally the order of the day.
One great and under-appreciated part of most rebuilds is the pleasure of new bits arriving by post. I’d collected the major electrical bits’n’bats from Sean Hawker at a show, so they were ready to refit. Then the speedo arrived back from Ian Bartram. When I’d ambled over to him – again at a show – and presented him with the burnt offering which was once Mr Smith’s finest, he’d looked a little worried. He looked long and quietly at the rusty lump. Shook it. Shook his head. Said encouraging things like; ‘Hmmm…’
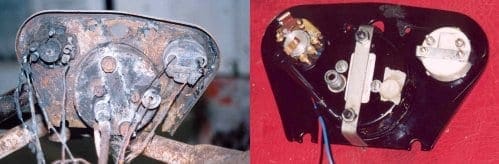
I asked him whether he thought the speedo was in any way fixable; whether I should buy a reconditioned item?
‘Hmmm…’
But he was sure that he could do something, and the next time we were both at the same show, he had the renewed item ready for me.
I asked how much of the original speedo he’d been able to salvage. You do not need to know the answer to this, but you can probably guess…
So I had a way of igniting the fuel mixture, a way of generating dc current to charge the battery, and a way of measuring my speed, should the Toaster ever roll again. But I did not have a means of getting fuel into the engine. Surrey Cycles, then. And bingo; along came an appropriately jetted and entirely new carburettor. Mr Postman made me happy, etc.
Time to start actual assembly, then. Hurrah. Again.
But what about the engine? I really do enjoy rebuilding engines (if not gearboxes) but time was galloping on. I had hoped to be able to attend this summer’s Ariel Owners’ Club events (and had stupidly mentioned this simple ambition several times on the club’s emailing list; stupid, stupid…), and to achieve this I needed to crack on a bit. So, I reminded myself that the engine had been rebuilt for the previous owner by Graham Horne, and I hadn’t believed that a fire could damage high quality componentry which is buried away deep within a set of crankcases, so…
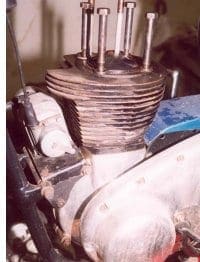
So, off with its head. Let’s see what lies within before deciding whether to rebuild the whole thing. The head came off easily enough, and the state of the valves and piston crowns confirmed that this engine had run hardly at all since it was last apart. Good news; good news at last.
I was also encouraged by the fact that inside the primary chaincases the whole primary transmission was fine, and that the part of the drive-side crankcase which is hidden by the primary cases was clean and undamaged. There was no slop at the drive-side main bearing, either, so I took a deep breath, replaced the head and prepared to drop the donkey back into its rightful home.
The most excellent Redditch Shotblasters has blasted shot at the frame and its engine-carrying bits, and had then powder-coated them all, so the first thing to do was collect piles of rags to protect that handsome black powder coat from assault by engine! The next thing to do was assault that same powder coat with round files, so that studding and the like would fit through the appropriate holes. Decently applied powder coating is pretty darn tough when it wants to be.
More pre-assembly prepping involved cleaning up all the studs which actually hold the power train into the frame. This is really worthwhile, although I am surprised by how few folk actually do it. I clean all threads, run the nuts up and down with the aid of a little thin oil until they spin freely at the flick of a finger. Although our favourite machines were most likely assembled without the aid of torque wrenches and the like, once you’ve had enough practice you get the feel for the correct degree of tightness for a fastening, and it is impossible to achieve this if the nuts grind stubbornly over gritty and damaged threads. So there.
The Ariel is a superior form of motorcycle, and is pleasantly symmetrical, which makes working out the correct location of spacers easy enough. Having said that, the chain lines were intended for the singles, and the twin engine hangs out to the right a little. Well, it may not be particularly elegant, but it works!
I assembled all the plates, spacers and studding without putting the nuts on at all, which gives you plenty of opportunity to ensure that things are where they should be. This is another good reason for maintaining a healthy supply of rags to provide a cushion should things slide about a bit! Once the engine is sat in its engine plates, it becomes very easy to fit the ancillaries, but before that happens, things need to be cleaned. Which is another reason never to buy a burned out bike!
The exhausts (which appear to be almost new and have no rust at all) are black chrome in places. I thought this would polish out. Profound application of abrasive language and abrasive chrome cleaners has revealed that this is not the case. Ditto with all those handsome alloy castings for which Ariel are justly admired throughout the world. Most of mine have a peculiarly ingrained sooty effect. Very nice, all very distinctive, so forth, but it’s never going to win prizes for beauty. But then, neither am I.
I tried all sorts of ways of getting the cases clean, and even bought (with my own money, which always comes as a shock) a parts cleaner, complete with paraffin jet and stiff brush. That removed the worst of the gunk, burned-on oils, rubber, gaskets, but not the mysterious darkness. The best way I found was to use lethal organic solvents; the sort of thing you’re never supposed to be able to buy, much less poison yourself in your shed with. The best, out of propan 2-ol (or isopropyl alcohol to humans), trike (both trichlorethane and trichlorethylene), methylene chloride and ethers was in fact the latter. So, so long as you don’t mind using car easy-start aerosols by the dozen, and don’t mind removing all the skin from your fingers while dissolving rubber gloves and observing how useless most barrier creams are… Do not do this at home! Modern motorcycle journalists would never encourage this abuse of solvents, of course, and rightly so.
So the cases will remain unusually tinted a subtle black. As will the exhausts.
Time to take off the timing cases, of which there are two in Mr Hopwood’s grand design. I’d already had the outer off to remove the mag and dynamo, and had cleaned it as well as I could. Interesting to see that Previous Owner had polished the cover within an inch of its life while the engine was actually assembled (Sherlock here was initially puzzled by the odd chamfering of the timing case screwheads). Interesting also to spot that the outer timing case carries bosses for drilling the mounting for a tacho drive. Did the rare Ariel Cyclone have one of these? Whatever, the bosses are definitely there, but not on another Huntmaster timing case I picked up at a jumble somewhere.
Before you can remove the inner timing cover, you need to remove the dynamo drive sprocket. This is fun. Not. It’s on a taper, and tapers break if you give them a sharp tap. So they say. Thor, King of Hammers, has a new chum in my toolbox in the shape of Slight Thorson, a rather smaller, more friendly and socially conscious kind of hammer, with which I applied several – nay, numerous – sharp taps. Finally, getting nowhere, I dug out a brutal old puller I’ve had since about 1968, jammed its jaws under the sprocket, tied them in place with a big jubilee clip, and belted the assembly with Thor, King of Hammers.
The sprocket came off. Those four words took a whole evening in The Shed to accomplish! And miraculously, the sprocket is undamaged. Order new nut and star washer from Draganfly. Clean up dynamo drive chain, and discover that under the congealed, partially burned and wholly unpleasant grease the chain was somehow amazingly rusted solid.
Order new chain from Draganfly. They are patient souls at Draganfly. They need to be…
Off then with the inner timing case, because I wanted to clean it up in my new parts washer, and because Something Was Missing. Given that this was a rebuilt engine, I was surprised to spot that the timed breather was entirely absent. Maybe the engine doesn’t really need it?
Email to Draganfly … which produced a secondhand steel breather and a range of cork washers of different thicknesses, the middle of which fitted the gap perfectly. Things are looking up!
And then! And then! Refit the magneto and its brand new automatic timing device. It fits! It turns! The loose HT leads emit unexpected and astonishing sparks! There is a smell of burning from my fingers. As well as pain. These are healthy sparks. Hold hands under cold tap.
And then! Refit the dynamo and its drive chain and sealing washer. Amazing progress.
Enlist aid of Better Half to squirt oil from oil can into engine oil feed while I heroically turn the engine using hands on the crankshaft drive sprocket. Curse. Put on gloves; try again. Oil goes everywhere. Observe that the oil pump is loose on its mountings. How can this be? Refit pump, with new gasket (thanks, nice men at Draganfly). Squirt more oil. Oil goes into engine. Hurrah.
Things are looking up…