Enjoy more RealClassic Magazine reading every month.
Click here to subscribe & save.
Even the best classic bike won’t corner correctly if its wheels are out of line. Les Howard has come up with an ingenious high-tech method to ensure one wheel follows the other, exactly…
I’ve owned motorcycles for over 40 years, and repaired or renovated lots of them.
Out of the all the maintenance jobs that were required, there was always the one job that never worked out to be as easy as it seems. That job is aligning the rear wheel in relation to the front wheel; usually required after replacing the tyre or tightening the chain. Having a dead straight piece of timber available to hand or using string seems an easy enough method but in practice, due to the usual smaller width front tyre or centrestand getting in the way, it can often prove to be a tedious job. You need to move around to the front and back of the bike over again or get someone to help as you try to line everything up.
Some people say it’s an easy job. I disagree. If the bike has cam-type adjusters then the use of an accurate device is not necessary. But how do you check accurately in the first place?
With the cheap and easily available laser line tools available at only a few pounds, the idea to make an easy to use and accurate device was very tempting. Well I made one and lashed it up very quickly. Since then, something similar has been seen elsewhere but my design is better in a couple of ways. So here it is for your goodselves to knock up in under an hour, at a cost of between £5 and £10 depending on the price you pay for the two lasers.
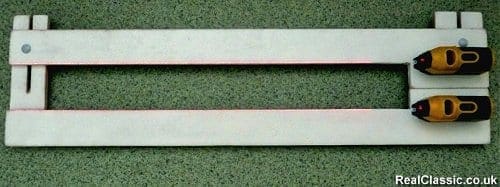
DIY Wheel Alignment Tool
The unit is made from good old MDF which means it will be cheap, easy to cut and stable especially if sealed with paint or varnish. You could choose to use quality plywood though.
As I had an available piece of 12mm MDF, I used that. Perhaps 18mm would be better and a bit stronger but the 12mm version as shown here works well. The choice is yours. Similarly, the dimensions are not in any way critical and you can vary them as you wish but one has to make it long enough to span the diameter of the rear wheel at between a quarter and a third of its height from the ground. My shown version will fit up to 19-inch wheels.
The whole thing can be cut with a hand saw but an electric saw table makes it slightly easier and quicker. As the laser is the source of accuracy don’t worry too much. The alignment can still be done and you will have perfect accuracy at the end.

DIY Wheel Alignment Tool – in use
The tool is in two separate pieces only and has built in clamps that quickly hold it securely to the tyre (see note). Obviously the tool must be used in a shady garage or in low light levels to show the laser lines projected on the floor. The position and inclination of the device can quickly be adjusted to throw the beam lines past the centre stand and show at the sides of the front wheel.
It is just a matter of setting the front wheel dead ahead and seeing instantly, even from the back of the bike, the relative position of the wheel to the lines and hence the rear wheel alignment . You can then easily set the adjusters to move the rear wheel so the beams sit perfectly equidistant from the front tyre walls. Usually the front tyre width is narrower than the rear and this will leave the beams just half the difference either side of it. This is where my design is superior to the other one, as the beams track the rear tyre width and are not spaced away from it. Their unit usually required a sighting board to aid the alignment but this is not necessary with my one.
Construction Notes:

DIY Wheel Alignment Tool – with main dimensions
1) The two main arms are the same dimensions. They can be cut by hand but a saw table makes it easier. The larger width L section holding the laser units is about 130mm long (not shown on the size photo). It just needs to be slightly longer than the laser unit.
2) The clamping pieces are just notched out with saw cuts. The slots are about 7mm wide and are about half the length of the piece. The M6 coach bolts fit through these slots to tighten the two bars together.
3) I simply glued the clamping pieces to the main bars and clamped them both together with PVA wood glue and let them dry overnight. You may wish to put in screws for strength but they seem ok without.
4) Drill 6mm holes in the matching position on the other bar in line with the slots and gently hammer in the 6mm coach-bolts. They are 40mm long. I used “penny washers” and wing nuts for tightening the clamps.
5) Before fitting the lasers, open up the front fixing slot to about 6mm and the rear hole to about 5mm diameter by drilling gently through from the underside of the unit. This gives the adjustment tolerance for setting the beam as the screws are smaller than the holes.
6) The units are simply switched on and positioned until the full width of the beams are visible on the upper surfaces at the bars inner edges. Make sure the beams are parallel to the edges. Hold steady, and use a bradawl to mark the positions, then use small cross headed self tapping screws to fix the units. Small adjustments can be made to line up the beam and then the screws retightened.
NB you may wish to set the beams in by about 1-2mm from the edge to avoid the beam clashing with the tyre edge which can sometimes happen depending on tread type. The very small increase in the two beams separation does not affect its accuracy. Keep the beams absolutely parallel to the edge though, and do both sides the same.
7) I guess for long term usage it will be better to seal it with varnish or use white paint. Don’t try to spray with car paint as the paint will instantly disappear into the MDF.
8) For an easier sliding fit of the adjustment clamps, rub a candle over the sliding surfaces to avoid any sticking.
|
|
Avon tyres on eBay.co.uk
|

Usage Tips:
Like using any tool for the first time, it could seem a bit fiddly to get the thing to fit and work correctly. After following these tips it will become an easy task and you’ll, hopefully be impressed at the accuracy and eventual ease to which you can use it.
1) To start, find 2x old tins such as an aerosol paint spray type or any similar size objects (wood blocks) and place them on their side front and back of the rear tyre. This will support the tool as you first fit the two halves together and tighten the wing nuts. Until you get the idea on how firmly to clamp up the unit it could fall down to the ground which I have to admit is annoying. Compress the 2 halves together to bite onto the tyre and firmly fasten the front nut.
2) Then angle the unit so the laser lines can be seen clearly at be both sides of the front tyre. Due to different centre stands, this may initially take a bit of fiddling to get the beams to pass clearly by. When you have the position, compress the rear bars together and tighten the rear clamp firmly. It should stay in place.
3) If at any times, when you’re manoeuvring it, one of the beams simply vanishes; it is most likely that you are twisting the tool in relation to the tyre vertical. This will make one of the beams hit the tyre. Once you know this, it is easy to check by looking at the beams and making sure one isn’t hitting the tyre. Turning the tool perpendicular to the tyre will allow both beams to pass by the tyre.
4) Once you have it clamped on correctly, walk around to the front of the bike and look down at the gaps between tyre and laser lines directly from above. You will easily see any bias towards one or the other as the misalignment and so you then adjust the rear wheel to correct and have the beams equidistant from the tyre edges.
5) As a further check that everything is in line tool wise, you could measure the beam separation distance as it leaves the unit and compare to the spacing at the most extreme position of the projected lines in front of the bike. They should be exactly the same i.e.: not diverging or converging.
You will soon get the hang of using it and fitting it under a minute and it’s a very comforting feeling to see clearly that your wheels are truly in line.

DIY Wheel Alignment Tool – in use
* If the tyre wall is soft, to avoid masking the laser beam, adjust the clamps so the board is in contact but not squashing the tyre. It will then be easier and quicker to chock up the front and rear of the unit with a block of wood or anything handy, rather rely solely on the clamps. Usually you will end up with a slight tilt downward at the front for best effect visible at the front wheel. Also read the note in point 6 in the Construction Notes. Back…