Enjoy more RealClassic Magazine reading every month.
Click here to subscribe & save.
If you’re restoring a classic bike at home, then you’ll inevitably need to paint some components. Sending everything off to the professionals can be costly, so Laurie Packer investigates a new DIY option…
With a good few restorations under my belt I am delighted when I come across a product which does exactly as it says on the tin – particularly if it’s paint.
Whilst powder-coating looks, on the face of it, a good approach to frame finish, it does have disadvantages. Because of the temperature in the baking oven, epoxy filler and even lead loading can be damaged and so the finish often retains the pitting of the original metal. A positive side to powder-coating is that when you come to spanner things up, the plasticity of the coating is forgiving and it does not crack as badly as some paint finishes. Neither, under torque pressure, does it readily stick to itself. However you are by no means guaranteed that the coating is not sitting on a coat of rust!
Paints nowadays are becoming quite woossey – even Hammerite is a shadow of its former self. As for polyurethene one pack that takes 6 months to fully harden…. well give me a break! You can go for the ultimate 2-pack, but that needs specialist breathing equipment and regular blood tests to detect the incorporated poisons. And don’t mention water-based paints!
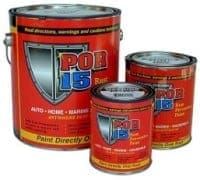
Every time I see an advert that claims wonderful things I reach for the salt cellar, but occasionally I say ‘What the hell..’ and that’s what happened when reading the blurb for POR15, a product emanating from the USA.
Now that’s a society that’s so litigious that any public claim as to a product’s properties has to be right. This stuff is marketed by Frost Auto Restoration Techniques, a firm with which I have absolutely no links.
|
Frost describe POR15 as ‘a rust preventative paint’ and say ‘Whilst any paint will provide some degree of protection from rust for a while, no other is as permanent as POR-15. When others have chipped, scratched, flaked, and peeled, POR-15 will still be preventing rust. Available in black, silver, grey or clear, US pint or quart POR-15 can be sprayed or brushed on to provide a rock hard, yet flexible, non-porous coating that will not shrink, peel, or crack. It is totally resistant to road salt, petrol, battery acid, etc, and actually dries harder in humid damp conditions. Ideal for suspension and chassis protection, and you can apply a topcoat of any finishing paint.’ I was working on a really tatty frame and girders for a 1927 BSA, so I went for a kit that had three 118ml tins of black POR15 and three 118ml tins of satin chassis black. The POR15 tin warned not to get paint on the lip of the tin else you will never get the lid off again. Ho ho ho I thought! On went the paint which brushed on perfectly, as per old fashioned enamel, and with first class coverage. The lid went back on the tin. Next day I discovered that the paint had dried hard but had not shrunk, as does cellulose paint. It was in perfect condition to wet-and-dry down and with no tendency for painted parts to stick together. The second coat was delayed by the time taken to get the lid off – they did not lie! The finish with two coats is high gloss and because this doesn’t lend itself to some parts – eg engine plates – the satin chassis coat went on as well. Perfection. |
Painty stuff on eBay |
 Having got to this point I experimented with tinware. I would normally go the acid etch, primer/filler, top coat and lacquer route but the adhesion I got from the POR15 set me thinking. So after any epoxy filler that was needed, and without being too precious about little imperfections, on went the magic brew by brush.
The following morning the paint was perfect for rubbing down, and after sufficient scuffing to get a key for the next layer, on went yellow primer filler. This was then rubbed down in time honoured fashion until only the imperfections showed in yellow. When I was satisfied that the finish was OK I switched to a brush coat of P400 Blackcoat. Next day I continued with a rub down with 600, then 1200 grade, and finally a coat of UPOL clear lacquer prior to final polishing.
Now this all sounds like a lot of work, and to an extent it is. But consider that the whole process takes only four days from start to finish. Consider also the price of professionally-painted tinware, and the buzz you get from doing it yourself. And although I haven’t had this finish in use on the road through a salty winter, I have already found that bolting things up does not cause damage — so bright yellow primer showing through the cracks is a thing of the past.
My experience suggests this stuff is well worth a try even if you still leave the tinware to the professionals!
—————
More info from the manufacturers:
Available in the UK from: