
Enjoy more RealClassic Magazine reading every month.
Click here to subscribe & save.
Spring is here, and obsessive suspension tinkerer Martin Gelder’s enthusiasm is undamped. Rebounding from a succession of old bikes with interesting steering, he weaves his way through a list of suggestions to help get the most out of a bike’s handling…
The science of how (and even why) motorcycles handle is a subject of much debate but little understanding amongst those of us who ride bikes. Even the people who design and build the motorcycles we ride have differing opinions on how to achieve handling nirvana.
But we can all improve the handling of our bikes – particularly the older ones – by making sure that a few basic settings and adjustments are right. When I get a new old bike I always spend a bit of time making some basic checks so that I know I’m getting the best possible quality of ride and handling.
The following applies to motorcycles with telescopic forks and swinging arm (or swinging fork, yes, I know) rear suspension. The basic principles probably go for girder forks and plunger rear ends as well, but sprung-hub sufferers are on their own.
Tyres
Tyres are your link to the road, and getting their size, profile and pressure right will probably make more difference than anything else to the way that your bike handles.
Tyre Pressures
Before doing anything else, make sure that your tyres are correctly set to the pressures recommended by the maker of the tyres. Unless you’re riding a particularly lightweight bike, this probably means pressures in the thirty-something p.s.i. range.
The pressures given in the owner’s handbook or original workshop manual for your bike relate to the tyres available at the time, not to recently manufactured examples. The correct pressure depends on the tyre and the load it’s carrying, not the bike it’s fitted to.
|
Tyre Sizes and Profiles Tyre profile has a huge effect on handling. Ideally, your bike should wear a matched pair of tyres, in the sizes recommended by the manufacturer. Tyres for classic bikes aren’t particularly expensive, and money spent here would be more useful than tinkering with different springs or replacement shock absorbers.
The profile of a tyre will change as it wears, generally flattening off the centre area, and this can also affect the way a bike feels as you turn into a corner. |
Tyring stuff on eBay |

Bushes and Bearings
There should be almost no play in the various bushes and bearings that keep the moving parts of your bike’s suspension and wheels from heading off down the road on their own.
With the bike firmly supported on the centre stand, grab the rear wheel at the top and bottom and wiggle it at ninety degrees to the direction of rotation. If you can feel any play – a slight knocking – the wheel bearings need replacing. While you’re at the back of the bike, put your thumb over the point where the swinging arm joins the frame, and try and move the other end of the swinging arm horizontally from side to side. If there’s any play in the swinging arm bushes you’ll feel it as a movement at your thumb. If you can feel any more than the slightest movement, the bushes need replacing.
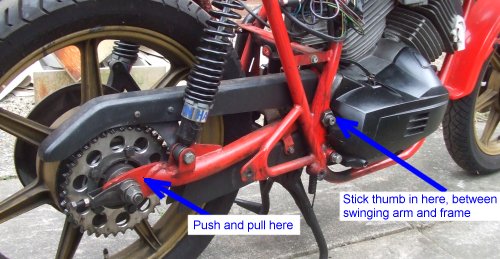
Checking the swinging arm bushes
Carry out the the same wheel bearing check on the front wheel, and then sitting in front of the bike, grab the fork legs and try and push them backwards and forwards; again, there shouldn’t be any movement in the fork bushes or play at the top of the steering head.
With the wheel still in the air turn the handlebars from full lock one way to full lock the other, feeling for notchiness as the bars turn. The handlebars should move easily and smoothly from side to side (you have disconnected that steering damper, haven’t you?) with no resistance other than that coming from the various control cables, but also with no looseness.
More modern bikes might have linkages in the suspension system between the swinging arm and the rear shock absorber(s) and there should be virtually no play in these, either.
“Virtually” no play is a slightly vague term, but there needs to be some clearance for the various bits to move against each other, and when felt through a suspension linkage (a series of levers designed to magnify movement) a small working clearance can feel like a noticeable amount of slack. If it clicks or clunks when you push or pull it, it’s probably worn out. The movement of all the suspension parts also should be smooth, without any roughness or stickiness.
Suspension
There are two elements to bike suspension; springs and dampers. The springs are there to support the weight of the bike, the dampers are there to keep the springs’ movement in check.
Dampers and springs can wear out, and they might have been replaced with incorrect units by a previous owner. It’s also a possibility that, in the twenty first century, some of us are slightly more portly than the designers of a lightweight bike in the austere post war years ever expected.
Springs
You can check the effectiveness of your bike’s springing by measuring the amount that it sags downwards when you take it off the stand and sit in the saddle. Unsurprisingly, this measure is known as the amount of “sag”.
With the bike on the stand and the rear wheel in the air, measure and make a note of the distance between the bottom of the seat and the rear wheel spindle. Now raise the front wheel in the air and make a similar measurement between the front wheel spindle and the bottom fork yoke.
You’ll need an assistant for this bit. Take the bike off its stand and sit in the saddle, allowing the suspension to settle to it’s natural position. Ideally you’ll be able to put your feet on the footpegs while your assistant balances the bike but in practice you just need to make sure that the bike is supporting as much of your weight as possible.
If you normally ride two up and with a mountain of luggage, it’s worth checking the rear sag with the bike loaded and both of you sat on it.
Measure the same distances at front and rear as before. The front “sag” is the difference between the two measurements taken at the front of the bike, the rear sag is the difference between the two measurements taken at the rear of the bike.
For most bikes, the front sag should be about 1/3 of the available fork travel, and the rear sag should be at most ¼ of the available rear wheel travel. For a bike with six inches of travel at each end, this means a front wheel sag of just over two inches and a rear wheel sag of an inch and a half.
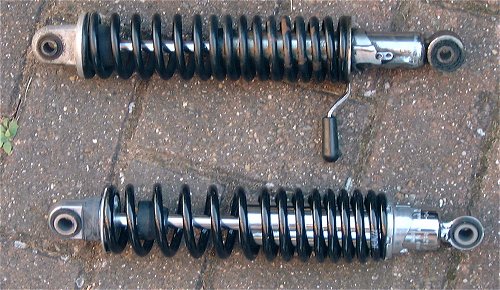
Replacement shock absorbers with the right spring rate can make a huge difference.
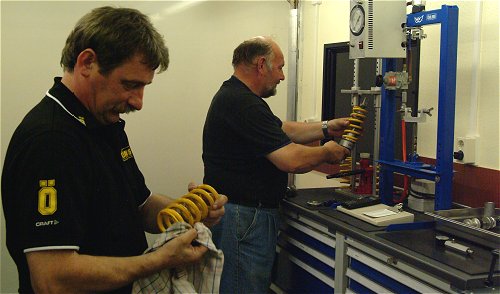
The best way to get the right amount of sag is by fitting the right springs. Springs lose their springiness and settle over time, and you might find that just fitting new springs of the standard rating is enough to restore decent handling. For the committed two-up tourer, a set of heavier rear springs might be worth the investment.
The amount of sag can also be adjusted by changing the preload on the springs, typically either by twisting a stepped collar fitted to the rear shocks or by inserting spacers inside the front forks. This is fine for small adjustments but changing the preload only affects the point at which the springs start to move, not their ability to cope with heavier weights.
If the bike is on maximum preload and still bottoms out (“clunk – ouch”) over big bumps, you need stiffer springs.
Provided you’ve got the sag set properly, your bike – with you on it – should be sitting pretty much in the way that its designer intended; not too low at the back and with enough ground clearance for a bit of spirited cornering.
Dampers
The damper in a suspension unit affects how quickly the spring compresses (compression damping) and rebounds (rebound damping).
Rebound damping gives control of the bike’s handling, compression damping gives “feel” to the rider.
Some simple suspension units only have rebound damping, and where only a single damping control is provided on adjustable suspension, it usually has the greatest effect on rebound damping.
When adjusting suspension, always make a note of all the settings before you start, so that you can go back to how it was if it all goes a bit pear shaped. The best starting point is with the manufacturer’s standard settings which will be in the handbook or manual.
Make just one change at a time, with a brief ride over a short road loop after each change. That way you’ll be able to feel and isolate what difference each change makes, and how changes at the back affect feel at the front, and vice versa.
Setting Rear Damping
Don’t worry if your rear suspension units don’t have any provision for you to adjust the damping; it’s probably near enough already unless you’ve made a significant change to the springs, in which case you might have been better off buying whole new units which will come with damping to match the springs.
If you can adjust the dampers, aim to set them with as little rebound damping as possible, but enough to avoid the bike wallowing at the rear on the exit of corners or in a straight line over bumps. If you have compression damping adjustment, start by backing it right off while you set the rebound dampers, and then once they’re right add more compression damping until the bike feels taut without feeling harsh.
For higher speeds or heavier loads, you might want to add a touch more rebound damping.
Setting Front Damping
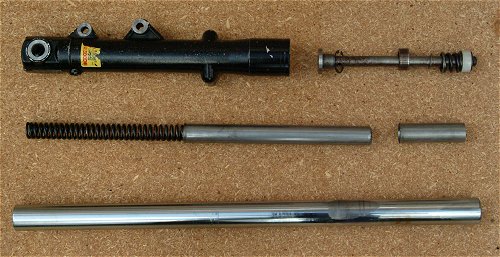
There’s much more scope for adjustment at the front end, because the damping is (generally) provided by a variable quantity of a variable weight of oil.
Start by draining the forks and refilling each leg with the correct quantity of the recommended grade of fork oil. The quantity of oil you use is important because the air above the oil in the forks acts as a secondary spring that is compressed when the forks compress. If you overfill the forks they may be too stiff and you risk blowing the oil seals as the air above the oil compresses. Adding a few extra millilitres of oil can fine tune the fork springing, but start with the standard amount.
Manufacturers of older bikes might recommend ATF (automatic transmission fluid) for forks but proper fork oil is widely available and more suitable. They may also suggest simply “medium” or “light” weight oil rather than a specific weight. Because of changes in the design of forks over the last fifteen years, 10W fork oil that used to be considered “light” is now sold as “medium”, so take care. 10W or 15W fork oil would be a good starting point for a smaller or medium sized bike, perhaps 20W for a heavyweight.
If your forks have adjustable dampers, fill them with the standard weight and amount of fork oil, and check all the settings are set back to the factory recommendations. Set the rebound damping so that the front end feels secure and controlled when coming off the brakes and turning into a corner, as this is probably the most critical work it has to do. Roundabout entries are good for this. As with the rear, if you have compression damping adjusters, get the rebound set first and then dial in more compression damping until the bike feels taut.
Air Suspension
Bikes with air-assisted suspension are starting to fall into the classic realm; stick to the recommended pressures and use a hand pump to add air, not a compressed air line.
Checklist
Tyres: A matched pair of tyres, at the right pressures
Preload: Enough preload on the correct springs so that the bike can deal with bumps and heavy braking without bottoming out
Damping: Rebound damping gives control, compression damping gives feel.
Further Reading
If there’s any interest, part 2 will go on to talk about curing common handling problems…