Enjoy more RealClassic Magazine reading every month.
Click here to subscribe & save.
Les Howard recommends a four stage process for stripping, cleaning, de-rusting and drying the petrol tank on your classic motorcycle. Appropriate clothing should be worn…
One of the worst chores that is so often required on a classic bike today is renovating the inside of a steel petrol tank, usually because of rust or an old tank sealing lining turning to a sticky goo. I have found a method and chemicals that can make the job at least a little easier, if not a lot easier, with minimum expense and great results. It’s basically the same process as most commercial products would utilise but not necessarily the same chemicals. It works out to be far cheaper than buying all the branded stuff and in my experience works incredibly well.
If you are the type of person who is accident prone, careless, frightened of using strong chemicals or going to ignore safety warnings then it would be better for yourself to ignore the method I am going to describe! Leave the tank for someone else to clean out or carry on with the same method that you already use.
I advise wearing eye protection, rubber gloves, a plastic apron, etc. I definitely insist that at all stages you have a large bucket filled with cold, clean water, even a water hose, ready to use, beside you at all times should you accidentally splash yourself anywhere with the chemicals. Your first reaction must be to wash off chemical that has somehow got onto your skin or spilt elsewhere.
So at this stage I’ve probably scared off everyone from attempting this method as it sounds like it’s massively dangerous. So long as you act confidently and carefully it is not inherently dangerous and mostly no different to any chemical tank cleaning method. I usually do the work in my carpet slippers, T-shirt and no gloves without any problems, but I know I am taking a slight risk and perform the task with extra care. Just be careful.
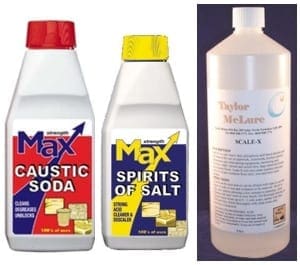
The two main chemicals used are caustic soda (sodium hydroxide, sold as a drain cleaner) powder or granules, and spirits of salt (hydrochloric acid, also sold as a drain cleaner). As an extra, phosphoric acid can be bought to finish the job if required or desired.
|
|
Caustic Classics on |
Caustic soda is dead cheap and 500g is enough. It can be bought in hardware or DIY stores or eBay. Spirits of salt is also dead cheap, can be obtained similarly. Phosphoric acid: at least 40% strength is required. Plenty on eBay too.
Stage 1: Gunge Removal
To start, pour out all the remaining petrol from the tank into a can and if it’s still any good save it for use at another time or in your lawnmower. I like to remove the fuel tap filters and re-fit the taps (making sure they are switched off) as they survive the whole process pretty well intact. If not, you should fit bolts to block off the holes. NEVER fit corks or putty or similar goo in the tap holes as this will come straight out and leave you saturated in chemicals.
I use the existing petrol cap which is usually enormously rusted too and it’s going to look like a new one (inside) as a nice bonus when the job is completed. You MUST then immediately tape over the cap vent hole with duct tape. It sticks very well or you can use a self tapping screw (but this could still leak, I’ve found). If you forget to block the cap hole, then again you are going to get strong chemicals all over yourself so do it right at the start as it is easy to forget.
The next stage is to place the tank squarely down somewhere outside or on a garage floor. Fill the tank to within about three inches from the top with clean water. Then with all the safety clothing on, slowly pour the entire contents (500g) of the caustic soda crystals into the water. This will raise the water level and also heat the water up quite a bit.
NEVER pour the powder into the tank and then add water. This is extremely dangerous and hazardous as the soda will boil the water this way and create a small explosion of steam and caustic soda.
After adding crystals to the water, top up the water level to the neck of the filler opening, covering the upper inside surface of the tank. After the liquid has cooled down a bit, the tank cap should be fitted extremely tightly and left to soak. Leave for several hours, then return suitably clad and rock the tank around a little. Carefully and slowly release any build-up of gas from the tank by slightly unscrewing the cap just a touch. Then re-fit the cap and rock the tank from end to end to fully mix the soda and water and disperse evenly.
Leave the tank for several more hours and then check it isn’t leaking water. If it is you are in a bit of trouble. If the leak is very small you can place the tank in a large outer vessel to hold the leak, bearing in mind that the chemical will strip paint very effectively which might not matter at all if you are renovating the paint job later.
If it’s not leaking, then simply leave to soak for another day and return again for further agitation and rocking. How many days will it be best to leave it? Well I have safely left tanks like this for about five days to get the full benefit but definitely two days to get good value and cleaning power.
When the time is up, you will have to dispose of the used soda and water. You will have to do this regardless of whatever chemical you use, so follow the recommended environmental method. Please note that this chemical solution will be still extremely strong and powerful and will not have been slaked or weakened by very much at all. It will literally dissolve skin — so be very careful.
(It is worth noting that caustic soda is used in abundance to clean grease from household and industrial drains. Knowing this might give an insight to which method of disposal can be viewed as OK!)
At the end of stage one all the old petrol gunge, any previous tank sealant and quite a bit of rust will be softened, removed and flushed out with the solution. The colour and filth of the liquid which leaves the tank will amaze and inspire you to go on to the next cleaning stage; to finish this stage simply hose out tank several times with a strong jet of fresh water.

Stage 2: Rust Removal
Now we have the rust removal to do and this is the bit that I get impressed by most. Spirits of Salt is a concentrated (Fuming strength) hydrochloric acid. I use it normally for chemically cleaning toilet bowls where there has been a build up of lime scale. This is what it is sold for mainly. It is very powerful and works quickly and effectively. So as a household product, it should not be too frightening, but I must emphasise it is very, very strong and because it fumes it will choke you if you inhale the fumes. Sounds dead scary, but just be very careful, no need to become terrified.
Pour about a pint of clean water into the tank and then carefully and SLOWLY add about a third of the 500g of acid, trying to avoid inhaling the fumes. NEVER pour in the acid and then add the water for the very same reason I mentioned before with the Soda, ALWAYS Acid ONTO water.
Screw back the cap and just like before, do a slight rock of the tank and then equalise the internal pressure by loosening the fuel cap and then tightening back on firmly. Next, you have just a bit more work to do than last time as it will require the tank to be rocked, shaken and inverted to completely swill around the small amount of acid so it can work on every part of the inside areas of the tank. Do this for a few minutes, and then leave for ten minutes. Return and carefully remove the cap. By checking with a torch, you will now see how well the acid is cleaning; you will also see how that rusty tank cap is starting to look quite healthy again on the inside.
You may now add another third of the acid and continue the agitation as before and leave another ten minutes. At no time will you need to rock the tank for more than a minute so there is not much effort required if this is worrying you. Once again re-inspect the inside with the help of a bright light. At this stage you should have quite a bit of gleaming un-rusted metal tank looking at best quite like it did at manufacture. I know it’s hard to believe but it will. Further acid strengthening and agitation will eventually, but still quite quickly, remove all the rust or burn it away.
I have found that NO abrasive components like shingle or bolts need to be added to bash off the rust flakes…hard to believe isn’t it? But no, the rust flakes will just have disappeared, possibly leaving the inside as clean as the proverbial whistle. Once you are at a level of cleaning that you’re happy with, stop the process and dispose of the acid solution, noting once again the acid is used for drain cleaning! Hose out and shake the tank thoroughly several times quite vigorously as the acid will have got into seams and will continue to etch away at the metal if left un-rinsed.
Stage 3: Nearly Finished, Etching
You now have the tank with the inside cleaner than you would have thought possible a few days earlier. You’ll be pleased of course and you might simply just want to rinse out very thoroughly and go to the drying stage. Another possibility is that you might consider neutralising any possible acid with an alkali such as a small touch of household bleach and rinse again and then go to the drying stage, but whatever you choose, get to the drying stage as quickly as possible as the metal inside is likely to start rusting slowly again if left damp.
I suggest going to a further acid stage using a quick splash around of Phosphoric Acid. This type of acid is not likely to etch the metal away strongly and will create a slight surface protection if a very slight amount is not washed completely away at the final rinse. So after about 10 minutes, stop the Phosphoric acid stage and pour away this relatively weak acid. (Not quite as corrosive to yourself as the Spirits of Salt in fact it is an ingredient of fizzy drinks). One quick water rinse is all that is needed now to finish. Another thing to note is that phosphoric acid usually converts brown rust flakes to a black compound but if you have done stage 2 to a fully bright clean result, there will be no brown flakes of rust any way to convert but the bright steel can be etched with some benefit of the anti corrosion resistant skin it can produce.
Stage 4: Drying
All we have to do now is to dry out the water as quickly as possible to ward off the spoiling of the nice metal finish by rust. Shake out as much water as you can, and I find there is a point that just flipping the tank quickly but quite lightly around with the filler-hole at the lowest point is the most effective as the water flips over the slight internal edge of the hole better this way. I know this sounds obvious but it’s difficult to describe.
I then use a hot air gun with the tank taps removed to get some air circulation through the tank. I stand the tank vertical so it acts like a chimney and aids the hot air movement, taking out the damp air with it. As the tank heats up quickly, it is better to try to rock the tank around at stages as the remaining water tends to puddle in crevices and when moved and spread quickly over the hot metal, it evaporates very quickly. Doing it this way, I can get a tank bone dry in about 15 minutes. Don’t heat the tank continually, by the way, with the hot air gun as you might do some damage to it. Always check underneath the filler cap which will be the hottest part.
You will now have a clean fresh tank inside and you have your own choice as to whether you go to a further stage and apply a tank sealing compound. I’m not going to describe that process here, but it’s going to be dead easy as the hard work has all been done. My last tank, a genuine un-restored 60 year old Norton tank cleaned up so well I am very tempted to just stop at this point and use it without further sealing protection but I’ll have to see and decide later.
During the drying process, you might just get a very tiny amount of tarnishing of the metal but nothing to worry about as sealing compounds will bond to this quite firmly and strongly.
Conclusions
Finally no need to rush anything but don’t leave the Spirits of Salt stage too long just in case in etches right though the metal. I have not seen a massive corrosion taking place and if the tank is going to leak it is better to have the acid clear away the weak metal to leave strong metal edges for sealing to.
Just be careful and act with concentration and with safety in mind at all times. I also don’t want to scare anybody off and hope I have not over emphasised the “dangers” as I would be prepared to do all the work naked in my kitchen without fear of damaging either me or the kitchen. Perhaps that thought is the scariest of them all, so I’ll get dressed now…
————–