Chapter 5. Wherein two steps forward are followed by a giant step backwards, and Jim Algar gives a nod to Archimedes and the inclined plane…
Enjoy more RealClassic Magazine reading every month.
Click here to subscribe & save.
The Dommi has been a bit lonely in the garage, and it’s been a while since I’ve had time to do any work on it. Other things have required my attention (and my wallet), like getting ready to send our daughter off to university and a few other mundane things, like earning the daily crust, making the mortgage payments, putting clothes on our backs… but I’m boring you.
Things got back on track with the arrival of a large parcel from Norvil containing my repaired crankcase halves (see previous chapters). The repairs were impressive, to say the least. The drive side has gained an entire new centre piece for the crank bearing to ride in, beautifully welded in. Hats off to he who can weld aluminium! And the mysterious missing chunk around the timing side bearing is filled in nicely.
But before returning to engine assembly, I first took time to finish up the gearbox. Included in the box from Norvil was the new layshaft to replace the one that I managed to ruin (Chapter 4). I’d also taken this opportunity to order an upgraded roller bearing for the layshaft, to replace the original ball bearing that’s an acknowledged weak point in Norton gearboxes. With these in hand, the box went together in a trice. A slight reluctance for the shift lever to return to centre after shifting up or down was cured by filing down a slight burr that had built up on the pawl carrier and was catching on the return spring cover. That’s that, then!
Time to fill the crankcase halves with parts. The crankshaft looks good; the main bearings that came out on disassembly were .010 oversize, hardly worn, and the crank journals show no scoring, so a nice new shiny set of .010 shells should do the trick. Soon the rods are back on the crank, the bearings are in place in the crankcase halves (I’m getting very good at the heat one piece/chill the other procedure), and it’s time to bring everything together.
With the camshaft in place in the drive side (a bit fiddly, that; there’s a timed breather disc that runs on the end of the camshaft, spring loaded to keep it pressed against the port, all of this at the bottom of a blind hole), the crank can follow, the timing side of the case offered up, and the nuts and bolts slowly tightened as the case halves move happily towards each other. I stop every minute or so, to check that the crank is rotating freely, which it is — up to a point.

Wouldn’t you know it; after the last half turn of all the nuts, the crank suddenly shows resistance when I try to turn it. Not much, but any is too much. I’ve run out of end play (end float to you.) Hmmm… time to put down the spanners and mull this over. Nothing about the crank has changed, of course, but the bearing at each end is new, and of course there’s the crankcase repairs… where have I lost that last little bit of clearance? Is the welded-in piece just the tiniest bit ‘fat’? Is one or both of the new crank bearings just infinitesimally thicker? Am I going out of my mind?
Well, the first thing to do is find out just how much I’m off by. I slowly loosen the crankcase nuts until the crankshaft rotates freely again, and then by the simple expedient of measuring the gap between the crankcase halves with a feeler gauge, I discover that I’m only talking about .003 inch or so. So close…
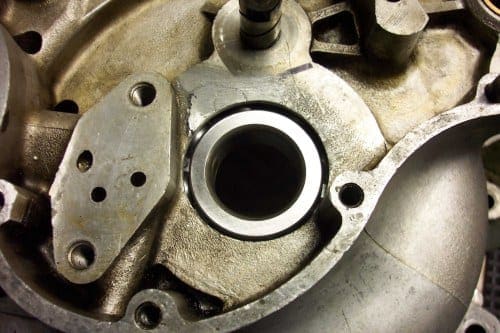
I hate going backwards, but there seems nothing for it but to disassemble everything and take another look. So I do. And as I’m looking at the drive side bearing race where it’s seated in the case half, does it maybe look like it’s sitting just the tiniest bit proud of the case? I grab my feeler gauge, which still has the .003 leaf out, and try to slide it between the bearing race outer face and the case… and it slips right in. Well.. hell! I am truly using up my chagrin allotment for the year. I was so sure that it had properly bottomed out when I put it in there… lesson number 1348 learned, and, as usual, the hard way. And abject apologies to both Norvil and the bearing manufacturer for ever doubting them.

Time to try again. Cam in, crank in, case halves together, tighten everything up (I’m getting pretty good at this, and faster, too!). Does the crank spin freely, as it should? Yes. Ah, then, things are looking up. Time to make some progress now, right? Things should move right along, shouldn’t they? I mean, we’re past the truly hard part, aren’t we? (Cue theme music from ‘Jaws.’ Ba-DUM. Ba-DUM. Ba-DUM You knew it was coming, didn’t you?)
The crank pinion gear, which drives, directly or indirectly, the camshaft, the dynamo, and the magneto, goes on without a fuss. Time for the pinion retaining nut. And wouldn’t you know it, this seemingly innocuous-sounding piece of hardware is about to bring the proceedings to a complete and screeching halt. Let me back up a bit here and mention, just in passing, that I had noticed that the threads on the crankshaft where this nut lives looked a little less than pristine, shall we say, but since the nut came off easily and smoothly during the initial teardown, I didn’t expect any real trauma when it was time to put it back on.
HAH!
Somehow, somewhere, at some time, the threads on the crank and the internal threads on the nut had, evidently, agreed to disagree. Oh, the nut would spin onto the crank, by hand, just as easily and smoothly as I could wish, for about… oh… five or six threads or so. Then it would suddenly begin to bind up, become harder and harder to turn, and even with a socket and spanner on it would eventually refuse to go any further, well short of the pinion gear that it’s supposed to retain. And when the nut was backed off (not an easy task), the crank threads underneath it have suddenly gone all shiny and semi-rounded rather than sharp… telltale signs of cross-threading. (Those of gentler sensibilities may wish to step out of my garage for a moment or two while I unburden myself of a few words I first learned hanging around my local petrol station).
I won’t bore you with the long, frustrating, and ultimately profitless series of events that followed. Suffice it to say that the end result was… no result at all. The nut is still not on the crank. And by the way, this is no ordinary nut. First of all, it’s a left-handed thread. Whitworth (of course). And it’s more than just a nut; it also incorporated the worm gear that drives the oil pump. So I’m not going to be able to run down to my local DIY store to look for a replacement. My only hope is to re-thread the crankshaft… and left-handed, Whitworth thread dies are not, as you might imagine, a common sight here in my part of the world.

So, I disassemble everything AGAIN, so that the crankshaft (and the nut) can go to Norvil. Hopefully their engineer, who so elegantly and perfectly made my crankcase repairs, can work some magic. One heartening note, here; I’ll be able to save on some of the postage costs. You see, it’s time for one of my occasional trips to the UK, so guess what’s going into my suitcase? That’s right, one Dominator crankshaft (complete). Curious about the weight? Right at 20 pounds. British Airways has a 70-pound weight allowance for any one piece of luggage, so I should be able to bring this off.
Should give the X-ray screeners at the airport something to think about, though. ‘Jeez, Earl, what the hell is that? Sure doesn’t look like a hair dryer!’
Oh, and that bit about Archimedes? Well, of course, he’s the fellow who worked out many of the principles of the ‘simple machines’… you know, levers and inclined planes and all that. And a screw thread is nothing but an inclined plane wrapped around a cylinder… simple, really.
And simply infuriating.