Phil Speakman has stripped down his MZ, ready to start restoring it to glory — which involves lots of decisions. To shot blast, sand blast or vapour blast? What sort of finish to opt for? And does copper really have the devil in it…?
Enjoy more RealClassic Magazine reading every month.
Click here to subscribe & save.
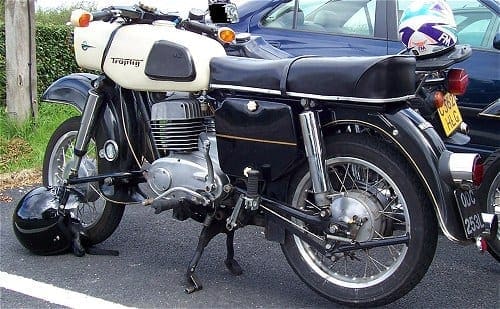
Once the strip down of my 1972 MZ ES250/2 Trophy was completed, it was time to outsource the work. In the past I have paint stripped, shot blasted, wire brushed and re-sprayed and yes; even powder coated from home. But not any more. The last time I did any re-spraying and saw the state of the garage afterwards I swore it would be my last. The filler and rubbed down primer dust gets everywhere, as does the overspray.
A couple of years ago I bought two old Mindon powder coating machines for £90 and made one good one from the two. However, I could only cure the smaller components in my electric oven once they’d been coated in gloss black powder, and the frame and swinging arms still had to be sent out to a professional,. So in reality the saving in doing things like footrests and various mounting brackets myself was quite minimal (maybe £60 or so per rebuild), which to me is nothing compared to the disruption it wrought within my garage, never mind the colossal amount of time it took me to a do a reasonably good job.
In fact, I’ve recently sold my shot blast cabinet on eBay as I was fed up with it squaring up to me each time I opened the door of my shed, the vindictive little anthropomorphised gloss red bugger!
‘Great’ I thought, ‘more room again in my garage’ and there was for a week or two until a £20 1950’s Smart and Brown lathe took its place and refused to move, the nasty squatting little anthropomorphised gloss blue bugger!
The frame, swinging arm, stands, footrest bars and all the other little fiddly bits were laid out on the floor of my powder coaters and photographed before I left them in their capable hands. I like to keep a visual record of everything I’d given them to ensure I got it all back again. Not that they have ever let me down in the past, but it’s always good to have a definitive list to prevent head scratching and conversations that start with ‘are you sure you gave us that blah blah blah’ later on.
Later that same day, I returned to the house of my engine rebuilder friend to receive the good news. All the internal components of my ES250’s motor were virtually like new. The piston still had the original machining marks on it and apart from one slight chip on one easily replaced gear wheel and the dead crank seals, all was well. To receive the good news wasn’t the only reason for going though, I was there to pick up the stripped crank cases, barrel, head and engine covers for the full treatment. After all, if you go to the trouble of a full strip down, you may as well get all the components looking their best ready for re-assembly and besides, my friend still had my crank rebuild to be getting on with.
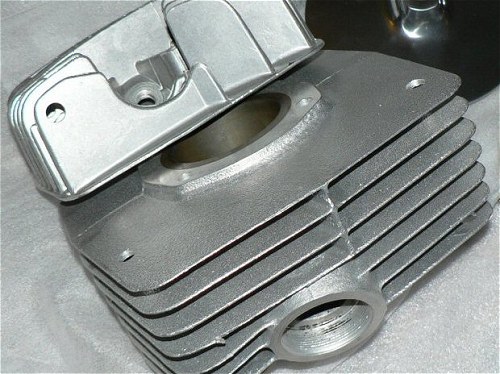
My local metal finisher isn’t cheap, but I think his work is as good as anybody’s out there. The head and barrel were low pressure vapour blasted to removed 33 years of corrosion, oil staining and salt damage, followed by slight over finishing in a barrel scrubber to achieve the ‘just left the Zschopau fettling plant’ look. The front and rear hubs also went through the same process, ready for my friendly local wheel builder to set to work on.
|
|
Random MZ Stuff on eBay.co.uk |

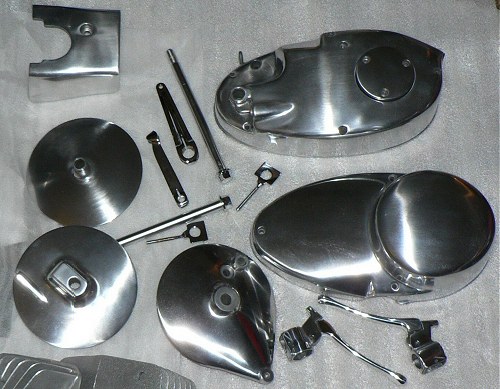
Over a coffee we discussed the finish I required on my engine cases and the vergaserdeckel (carburettor cover) and as I didn’t want them polished to a mirror finish he suggested another final polishing mop finish instead. He showed me an example of this finish which we agreed would most closely replicate the best of the three available Zschopau factory finishes that were available to the 1970’s discerning MZ purchaser. Die cast, dull or factory polished. The same finish was agreed for the brake plates, but I wanted the wheel rims, the handlebar levers and choke lever mirror polished, as in my eyes they seem to look better that way. These will all be vapour blasted first to remove 30 years worth of dings and scratches, but it is so much less aggressive than shot blasting that can often ruin an alloy component by eroding it beyond saving within a couple of seconds.
He always likes working on MZ aluminium components as he reckons that compared to some Japanese and British components, their quality is far superior. The Germans only seemed to know how to make things one way in aluminium and that was ‘right’. His words, not mine.
I also left him a little bit of re-chroming work too, but the DDR bikes weren’t big on chrome plating due to the cost of importing chromium from the far east. It didn’t occur naturally in the region and they simply didn’t have the foreign currency available to them to justify importing it just to be used as decoration. Although lacking in chromium, the gentle rolling mineral rich Saxony hills are abundant in other minerals such as aluminium, silver and copper. It was 18th century Saxony copper smelters who first discovered Nickel or ‘Kupfernickel’ which translates as ‘copper with the devil in it’ as it looked like copper but was too hard to be made malleable. It was this abundant ore supply that was the very reason for the DKW factory being situated there in the first place.
I degreased the crank cases myself and they cleaned up very well with degreaser, detergent and a bit of elbow grease with a small wire brush. I was considering getting them barrel scrubbed, but they were so clean it really would have been a waste of money.
So then I just had to wait for the bits to come running back to me…