More Morini Meanderings from Martin Gelder; this time it’s rearsets, clip-ons and inevitable Italian illectrics – and a philosophical question for Real Classic bike owners…
Enjoy more RealClassic Magazine reading every month.
Click here to subscribe & save.
A couple of months back I thought it would be easy to sit here and churn out a few thousand words every month on the trials and tribulations of owning a Real Italian Classic. Endless tales of dark hours spent in the shed and cold days wasted roaming auto jumbles for vital parts.
But I’ve hit a snag. The mistake I made was buying a bike that not only had its full complement of tax and mot, but which was also perfectly rideable. It had its faults, but fundamentally there was nothing wrong with it.
Which is why I’ve spent most of the last six weeks riding my Morini rather than working on it.
|
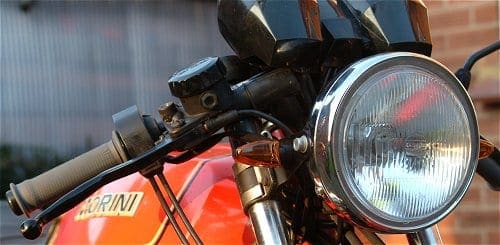
You’ll be familiar with the problem, I’m sure. You head out to the garage with some minor domestic errand on your mind, and before you know it the keys are in your hand, a helmet on your head and you’re off down the road. Blown light bulbs can wait; riding is more important. At the end of the last report I was moaning about the riding position, but a quick call to North Leicester Motorcycles and the exchange of money for mail-order goods solved that one with the delivery of a set of model-specific Tarozzi rearsets. They were in stock, they bolted straight on and they immediately transformed the riding position from “doubled over hunchback on the toilet” to “comfortable human being in full control of motorcycle”. Bolting them straight on did throw up a couple of problems though. The left-sided rear brake pedal is moved back to the point where it interferes with the kickstart. NLM thoughtfully provide an extender-pivot-block-thing for the kickstart lever which moves it out sufficiently for everything to clear, but it seems that I have the wrong kind of kickstart lever… Bugger. There are three types of Morini 3½ kickstart, and the one I need seems to be completely unavailable at the moment. Still, who needs a rear brake anyway? |

A quick spin round the block revealed that the pedal arm sticks out enough to make the back brake useable as it is for now, but there are a number of other options open to me until I can get hold of the right kind of kickstart lever:

With the brake conundrum resolved (well, kind of…) it was back out on the road for a proper spin. The riding position was improved enormously – overall control of the bike was much better, and riding was now a real pleasure. Replacing the old and loose gear change linkage with the slick Tarozzi set-up had transformed changes up through the box, making them much more positive as I could now feel the gears snicking into place.
Going back down through the gears was less encouraging. Once back at home and grovelling round on the floor the problem was soon located; at full travel the rod between the rearset operating arm and the arm on the end of the selector shaft was just touching the bottom of the crankcase. There wasn’t enough bend in the rod supplied with the kit to provide the necessary clearance, but an hour’s work with some 6mm bar and a set of M6 dies turned out a longer and curvier rod which would drop below the crankcase enough to miss everything in its path.
I was a bit worried that my home made solution would prove too flexible (the original part was 8mm in diameter, stepped down to 6mm for the threaded bits) but it seems to be bearing up well. The gear change is now really positive both up and down, with false neutrals banished completely. I suspect that the bendy rod has introduced a bit of “give” between foot and gearbox which lets the box work at its own pace, but ask me again in six months time when the whole thing is starting to look like a coat hanger…
With feet happily hooked onto the new pegs, it was time to sort out the hand controls. The right-hand clip-on was trapping my thumb against the tank on full lock and seemed to be slightly lower than the left so the first step was to line everything up properly. So off with the headlight – why are no two bolts the same on this bike? – and out with the tape measure and string to get the right clip-on at the same height and angle as the left one. It’s a fiddly thing to do but it makes a huge difference to the feel of a bike. You can adapt to bent handlebars or uneven clip-ons quickly, but I think you can still feel the difference subconsciously, and a frame as taut and responsive as the Morini’s deserves the effort.
The bike had come with thick and chunky “foam” grips; the accessory of choice for the discerning motorcyclist of 1983 but in the cold light of the twenty first century an abomination of aftermarket tat. The theory is that they cut down vibration, but in reality you end up squeezing them more tightly than you would normal grips and so feeling every single rattle of the engine. A much better solution is a set of sticky Renthals grips (available in a choice of three compounds!) which let you control the bike without a white knuckle grip on the bars. Their thinner diameter also fools the mind into thinking that the bike is lighter, and on the Morini they even seemed to improve the operation of the front brake.

The bars, pegs and seat are where you touch the motorcycle, where you control it from and where it talks back to you. It really is worth spending the time getting them as right as you can, especially on a bike with performance pretensions. The potential I was aware of during my first rides on the Morini is now really beginning to shine through; for the first time I can actually feel the effect of the steering damper… I’d initially dismissed it as having no effect, but there is now enough feel transmitted that I can tell *why* I am thuppenny-bitting my way round slow and greasy corners.
And it was while ducking and diving round just such a slow and greasy corner that I noticed that the front indicators had turned into hazard flashers. Move the switch to the left, and the left rear and both front indicators come on. Move the switch to the right and the right rear and – you’re ahead of me here, aren’t you? – once again both front indicators come on. It was inevitable really. The Morini is Italian, and Italian bikes come fitted with Italian electrics.
It was obviously something that I’d disturbed while tinkering. It couldn’t be anything in the footpeg region, because I’d ridden it since fitting the rear-sets and it had been fine. So therefore it was something to do with having moved the right clip-on. Which is odd, because the indicator switch is on the left clip-on… So off with the headlight, carefully removing the two socket head bolts I’d used to replace the mismatched screws holding it in place. The usual suspect at times like this is a bad earth connection, but both sides seemed okay. Just to check, I removed the earth lead from the left lamp to clean it, and noticed that the right side lamp now flashed in perfect coordination with its partner at the rear. I refitted the left earth lead, and the fault returned. So obviously I had a case of a *good* earth rather than a bad earth. Removing the right side earth lead restored the performance of the left side pair of flashers. Okay…
And then I remembered that one of the screws holding the headlight to its bracket had had insulation tape wrapped around it. At the time I’d thought that this was to make the shaft the right diameter for the hole in the bracket, but I was obviously wrong. The tape was there to insulate the two headlamp brackets (to which the indicators mount) from each other. With decent bolts in place, the headlamp shell was making a circuit between the two brackets and thus shorting out the earth leads for the left and right indicators.
“But surely”, you are thinking, “it won’t make any difference whether the two earth leads are connected or not.” Well, not on a normal bike, no. And don’t call me Shirley. But these earth leads – despite being firmly bolted to metal bits of the bike – aren’t earth leads as such, and they rely on being kept separate from each other before continuing their path back into the murky tangle of the wiring loom. As a test I fitted a two-wire mini-indicator which I’d removed from a previous bike before selling it. Bingo. Nice smooth regular flashes, and as a bonus the idiot light between the clocks had started working as well. The new and smaller unit also looked like it belonged in the bike, much less obtrusive than the ones there previously. So on went the other mini-indicator as well – a matching pair.

Which raises an interesting question. Should I leave the Morini as standard as I can, or should I improve it where there are real advantages?
I suppose I’ve answered that already by fitting rear-sets, but that’s exactly what I would have done if I’d owned this bike when it was new. To my eyes, the smaller indicators make the front of the bike look so much sleeker that I’d find it really hard to refit the originals. So the small ones stay, and I’m on the look out for a matching pair to fit at the back. If nothing else, they save so much weight and cut down on frontal area to such an extant that I reckon there’s at least 3 mph (maybe 3.2 mph) lurking in there. Probably.

So the big old indicators go into the box full of forward footpegs and spongy handlebar grips that I’m saving for posterity or the next owner, whichever comes first.
What’s next? The engine. Fresh oil, clean oil filter, new air filters, tappets adjusted, timing checked, carbs balanced and the like. If I can stop riding for long enough…
Standard or Improved; What do you reckon?
People to talk to: