Jim Algar’s restoration of a classic Norton twin continues… slowly. Some sundry tasks are accomplished and Jim makes the acquaintance of the World’s Largest Rubber Band…
Enjoy more RealClassic Magazine reading every month.
Click here to subscribe & save.
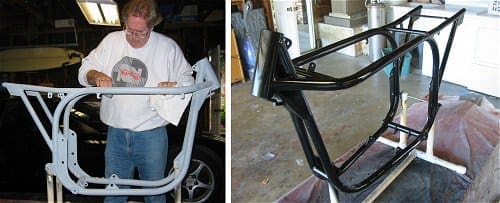
When last we met (yes, it’s been many months; what can I say?), I was waiting for warmer weather to paint my frame. Well, the weather cooperated, so after a coat of primer and some wet sanding, out came the aerosol can of PJ1 ‘Gloss Black, Porcelain-Hard, Epoxy Paint’ and — hey presto! — painted frame.
Not too bad, if I do say so myself. I had visions of treating all of the tinware to the same technique… a vision I soon abandoned after a first trial attempt. Painting small diameter frame tubes, where the fan of paint coming out of the aerosol container can completely span the part being painted, is one thing, but on the larger areas of tinware, where you must overlap passes of the paint spray and get them to flow and flatten smoothly… well, I wasn’t happy with the result, so I’ve decided to let a professional have at those parts.

But at least I can strip off the old paint. Liberal applications of ‘Paint and Graffiti Remover’ from the local DIY turns the old paint into a wrinkled, fuzzy-looking sludge that easily comes off under a high-pressure water spray. Progress! And the tinware doesn’t look too bad for fifty-year-old parts… except for the rear mudguard, which has been hacked about a bit. Under the paint it shows evidence of previous attempts to repair cracking – signs of brazing are everywhere – and I know the reason for that.
A Dommi rear mudguard has three mounting points: at the very front two bolts attach it to a frame plate; at the rear there are two bolts at the back end of the lift handles; and in the middle is the main mounting point that should (wait for it) provide the strongest, most secure attachment… which was entirely missing on the bike as I bought it. The upper shock mounting bolts are supposed to be long items that pass through the forward ends of the lift handles, through the frame and shock eye, and then continue through a couple of tapered aluminium spacers into the mudguard, where a washer and nut on the inside of the mudguard pulls the whole assembly securely together.
Well, a previous owner had decided (?) he didn’t need that, and simply substituted short upper shock mounting bolts, which held the shocks in their frame brackets but left the middle of the mudguard floating in mid-air, unsupported, able to move up and down and from side to side… and we’re surprised that there’s been cracking? And that there is filler around those middle mounting points? Why, oh why, do people do things like that? I despair. But I shall correct it, so onward, ever onward. A quick coat of aerosol primer to keep rust at bay until I can get the parts to the painter, and the tinware goes on the shelf while I consider the next task.

Which brings me to the rear brake drum / wheel hub. I mentioned earlier (Chapter 8) that there was a problem with the rear wheel hub. As with many bikes of the era, the Norton featured a Quick Disconnect rear wheel, wherein the wheel could be removed without having to disturb the chain, sprocket and brake drum, which remained on the bike on a stub axle while you went about the roadside task of repairing your flat tire. When finished, the wheel went back on the bike and was re-joined to the brake drum by means of long sleeve nuts that threaded onto studs on the drum. But the threads on my drum studs were a bit dodgy, to say the least. Long sessions of trolling eBay for a better drum were unproductive, as were a couple of trips to (rare) Southern California autojumbles.
What to do? I was pretty sure that with enough force and thread lock compound I could securely bring the hub and drum together; the question would be, would they easily come apart if needed? It’s the ‘if needed’ part that decided me; in this age of cell phones, Auto Club, and roadside recovery services, did I really expect (especially at my age) to be attempting roadside flat tyre repair? Not likely. (And of course if absolutely necessary, still an option, through the removal of the whole wheel assembly, drum, sprocket and all.) Decision made: problem solved: hub, drum and sprocket are now once again happily – and securely – joined together.
|
Next, the rear dampers. As I’ve mentioned, the ones on my bike are Armstrongs, not the more common and more usual Girlings. I decided to disassemble them, for two reasons; they could use a little cosmetic touching up, and once apart I could determine if they were still up to the task of providing the necessary damping. They come apart easily, and by pretending that I’m a swinging arm and pushing and pulling on the shock shaft, I’m pleased to find that they still exhibit commendable damping action. The spring covers will join the parts going off to a pukka painter, but I can touch up the shock bodies and springs myself.
The Armstrongs are interesting in that there are two springs on each unit; a longer upper spring and a much shorter lower one, separated by an adjustment collar that can be turned so that either both springs are in play, for a softer setting, or the lower spring is locked out, for a harder ride. Steve Wilson, in RC28, finds the same units on a 1955 Panther Model 100S, suggesting the adjustment could come in handy for sidecar work. |
Random Dominator stuff on eBay.co.uk |

Time to put a big chunk of the bike back on, namely the entire engine/gearbox assembly with its mounting plates. With this in place, it’s time to turn my attention to the most universally derided bit of Norton engineering, the primary chaincase. There are several ways to affect an oil-tight chaincase… and Norton wouldn’t hear of any of them. Thick, cast inner and outer case halves, securely bolted together, would be good.
But no.
And if you must use thin pressed pieces, or course you’ll at least go for some secure attachment around the mating edges, like bolts or screws or perhaps a big honking clamp all around the outer edge.
But no.
Norton had its own idea; the World’s Largest Rubber Band. Fitted around the outer circumference of the inner case, it’s supposed to seal as the outer case is slid onto it and secured by nothing more that a single large nut on the footrest tube. Fine in theory, perhaps, but unworkable in the real word.

The slightest distortion of either the inner or outer case and it’s bye-bye seal, hello weeping chain case. I’ve done my best to straighten my case halves; I’ve painted the inner myself and mounted it with its sealing band, awaiting the return of the outer case half from a painter. We’ll only know how successful my straightening efforts have been when the pieces are re-united.
Next Time: Jim enjoys (?) close encounters with the cylinder head…