Enjoy more RealClassic Magazine reading every month.
Click here to subscribe & save.
Transform your juddering and shuddering classic bike into a smooth performer. Always a sucker for a workshop gadget, Martin Gelder presents a balanced approach to carburettor set-up using vacuum dial gauges…
A set of carefully balanced carburettors can transform the way a bike rides. They can turn a shuddering and rattling monster into a smoothly humming wonder, and transform a jerky nightmare into a delicate dream. And balancing carbs isn’t that difficult with the right tools and a little patience.
I’ve been using a set of vacuum gauges for more than thirty years, and they’re now a vital tool when servicing any multi-cylinder bike I own. Cheaper dial gauges are available and some people swear by the manometer u-tube or systems, but I’ve always found it easy to get a reliable balance using vacuum gauges.
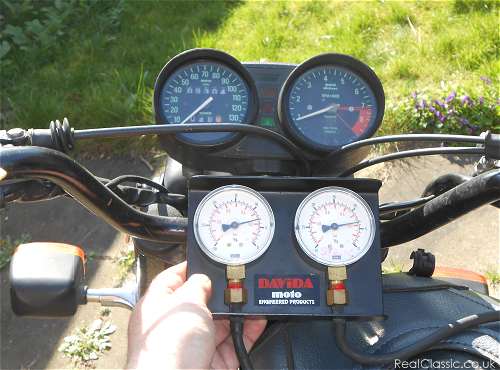
Happiness is a set of balanced carbs. Engine is ticking over, two 490cc pistons are whumping back and forth, vacuum needles are steady.
There are also other approaches to making sure a bike is ticking over smoothly (removing a plug lead from each cylinder in turn on a twin) or that the carb slides are lifting at the same time (measuring movement or visual inspection) but these don’t achieve balance when the engine is running at normal riding speeds, or during the crucial period when the throttles are just starting to open. The advantage of using a system that measures the inlet port vacuum is that you’re setting the carbs based on what they’re actually doing rather than a static judgement of how they should be working.
Balancing the carbs should be the last step in a routine service, after all the other adjustments and maintenance tasks have been done. Set the valve clearances, set the points gap and – particularly if your bike uses a set of points for each cylinder, set the timing as accurately as you can and if possible check it dynamically so that you know that the advance is working on both cylinders. I’ve got an old Gunson timing light that I use as a final timing check; another of those invaluable tools that you buy once but benefit from many times over the years. Clean spark plugs, well seated HT leads, inlet rubbers properly seated and sealed, air filter clean, cables lubed, fresh fuel – anything that might make one cylinder run differently to another needs to be eliminated before you start.
I also take the bike for a decent run to warm it up properly before tinkering with the carb balance; you want it be able to tick over if possible and – on my old airhead BMW, anyway – that needs a good ten miles of running before it’ll cooperate.

Typical Morini carburettor. Gauges connect to each carb in place of balance pipe.
The vacuum gauges need to be connected to the inlet ports just upstream of the slide or throttle valve, and most bikes I’ve owned have had a convenient way of doing this, usually in the shape of a screw-plugged fitting in the carb itself (BMW) or on the inlet manifold (Moto Guzzi) or a vacuum pipe attachment on the carb (Morini) or inlet rubber (most Japanese multis, etc). My gauges came with a set of threaded adapters but the Morini and BMW I’ve used in the photos just need the pipes slipping over an existing take off point.
|
|
Classic BMWs on Now… |

You’ll also need to know where the tickover adjustment (or throttle stop) and mixture (or pilot) screw is, where the throttle cable or throttle linkage adjustment is, and for bikes which use a single cable to open three or more carbs, which order to balance them in. Use the manual to check this; you’ll save yourself a lot of going round in circles. The procedure that I’m going to describe is for bikes that have separate adjustments for tickover and throttle opening; on multi-cylinder bikes with a single cable to open the throttles, it’s actually a simpler procedure but you’ll need to follow the manual for your bike.
Check that there is the correct amount of slack in the throttle cables, and make sure there’s a decent supply of fuel to the carbs. If you need to remove the petrol tank to adjust the carbs, you’ll need to sort out a fuel feed; I use an extended fuel pipe from the standard tank. Make sure the petrol is turned on, too.

BMW make adjustment easy; tickover is adjusted with the throttle-stop screw and throttle opening is adjusted at the cable.
With the gauges connected and positioned somewhere where you can see them while the bike is running, start your engine and let it tickover. If it’s a parallel twin, make sure the gauges aren’t going to vibrate onto the floor when you rev the engine.
The needles should give steady reading, and the important thing is not the values indicated but that the two cylinders are indicating the same value. If the two readings are different, adjust the tickover / throttle stop screw of one carb to bring the two gauges into line. Try turning it both ways to see what effect it has; you might find that turning the screw on one carb affects the readings on both, so be patient. Remember, you’re not looking for a specific amount of vacuum, just that both gauges are giving the same reading.
Now that the bike is ticking over smoothly, check the mixture screws on each carb. I usually give each side half a turn in each direction to see if I can improve the slow running, but generally the settings in the manual shouldn’t be too far out. Once you’ve got the best tickover, check the gauges again and if necessary rebalance the carbs. Finally, you might find that the tickover has gone up significantly as a result of the adjustments you’ve made, so slow it down using the tickover / throttle stop screws on each carb, checking the balance as you go.
The bike has probably been ticking over on its stand for about five minutes now, so you might want to let it cool down for a minute or two.

The actual reading on the gauge isn’t important, it’s getting both to read the same that counts. These still need a tiny tweak…
Step two is setting the throttle cables so that the carbs open at the same time and by the same amount. Getting this right will make a real difference to how the bike feels on the road, improving throttle response, reducing snatch at small throttle openings and adding smoothness at cruising speed.
Start the bike and let its tickover settle. While watching the gauges, gently and gradually open the throttle. Both needles should move at the same time, by the same amount and in the same direction. As you let the revs rise the needles should sweep across the dials in unison and if you hold a steady throttle at – say – half revs, the gauges should give the same reading. If these things don’t happen, you need to adjust the amount of cable slack to get both throttles working together.
As with the tickover adjustment, changing one carb might affect the reading of both cylinders, so I’d recommend only making adjustments to one carburettor. You’re aiming to balance the two readings rather than going for a specific amount of vacuum. Loosen the cable adjuster lock-nut on one carb, and restart the engine. Holding a steady throttle at about half revs, wind the adjuster in or out until the gauges show the same reading. Once you’ve got a setting for a steady throttle, check that the needles sweep across the dials together as you open and close the throttle, then tighten the adjuster lock-nut. The tickover should settle back to its balanced state when you shut the throttle and as a last check, turn the bars from full lock to full lock to check the carbs stay in balance.

All you need. Two spanners, a screwdriver and a set of vacuum gauges
Make sure everything you’ve loosened is tight again, don’t forget to replace the screws that seal the vacuum take-offs, then go for a ride and enjoy the smooth pickup and better response from your motor.
Words and Photos: Martin Gelder