At last! Philip Rashleigh can get his scrambler special engine assembled…
Enjoy more RealClassic Magazine reading every month.
Click here to subscribe & save.
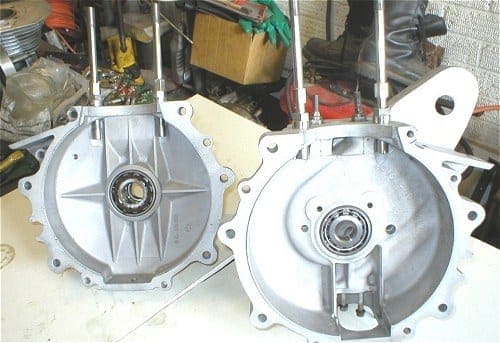
The bare engine cases had been sent to Roy the engineer what seemed like a long, long time ago. I had cleaned them and inspected the alloy (as mentioned in a previous instalment) but they really needed a good clean. There was what seemed like beach sand, mud and grit in the cases from the time the bike was left standing before I bought it.
Roy stripped the cases of the fittings left in them, cleaned them in his engine washer, and then gave them a light bead blast, ran all the threads with No 3 taps and gave them another wash in solvent. The bearings that came out of the cases were discarded and the rest of the components were washed in the engine cleaner and then solvent washed and visually checked and measured to see if they were serviceable.
Assembly of the cases was just a matter of installing the components that had been removed, pressing in the new main bearings, popping in the crank and putting the case halves together. All the bearing surfaces had a drop of Morris’ 20/50 oil to help with the assembly.

The timing side was assembled with the Goldie Scrambles spec cams, lightened idler gear and alloy timing gear plate (does anyone do a Perspex cover so I can show this lot off?!). I must add we were going to put roller bearings in this lot but I forgot to ask and Roy assumed that as I hadn’t asked I didn’t want. Still, there is always next time and the completed rolling chassis is waiting. One small niggling problem was that one of the cams was thinner than standard (no reason why) but not thin enough to make a shim of a sensible thickness (there is a long story behind this, the whys and wherefores that I am not going into)… so what to do? We opted to surface grind the cam thinner, and make up a shim to suit (does this make it lighter?).
|
|
Random B31 stuff on eBay.co.uk |

The piston is a +20 thou item as the barrel had been re-bored in January. The piston was fitted to the conrod with the help of a gudgeon pin and some nice new oil. Fitting the barrel to the cases was harder; the barrel didn’t want to go into the throat of the cases (bu**er!). Now I knew the alloy finned part of the barrel had been welded as it had cracked (a common problem), and this had then been over-bored and an over-sized liner had been fitted and turned down to suit the cases from the original DBD34GS motor. BUT my cases were about 4-thou smaller.
PANIC!!!
Well, panic reigned for about five minutes until I called Roy. The answer was simple. ‘I’ll stick the barrel in the lathe, boy. I have a jig, and I’ll take a few thou off it.’
Oh right, well OK then.
‘It’s not a problem boy; you can see where it’s been machined before.’
Oh OK, Panic over.
The barrel was duly machined to fit and then placed over the piston and onto the cases.
So up we went towards the cylinder head. This was in a fairly grotty condition; however when it came to the build Roy had a good look, and decided that it was worse than first thought. I started seeing £££ signs but Roy, being the top bloke he is, told me he had quoted for the work and as I have paid it, that’s all I am going to pay. He said it was his mistake and he will take the extra cost. Top Banana I say!
 So that’s new valves, springs and collets. The guides were in very good condition (the only part of the head apart from the original casting that was) and were lightly reamed to check the size.
Head on, now it’s the rocker box. We had been let down by a well known supplier after a six month wait and broken promises, there we were in a state of free fall about the rocker box. Roy knew he had a rocker box but it wasn’t machined and it didn’t have the decompression cable stop and he really wanted to keep it for a possible race bike engine. What to do? Use it! A cable stop was found on a shelf from a previous race engine project Roy had. This was duly TiG welded on (is there no end to this man’s talent?) then bead blasted it to match the rest of the rocker box.
The box was then machined to take the B31 rocker shafts (bit of a hybrid engine this) and then fitted. The length needed for the pushrods was measured and the rare(ish) B33 pushrods were shortened to fit. The reason that the B33 / B31 rods are too long is that as the B series engine was developed in to the Gold Star all-alloy engines (ZB, BB, CB, DB & DBD) the connecting rod got shorter, though the stroke stayed the same. The DBD34 barrel is some two fins shorter than, say, a B33 barrel.

We rebuilt the oil pump and made sure it was functioning at its best. Why it was seized when it was full of horrible black oil is a little puzzling, but there you go.
You may have noticed a few ‘dress up’ items; the timing plate and oil feed are SRM, whilst the alloy sump plate is from Roy. I’ll let you know how I get on with these items when the bike is running.
So that’s the dry build complete. Everything fits as it should, now tear it all apart and then re-assemble and time it all up: Job done.
I now have to get the rolling chassis to Bedfordshire and get the engine fitted and set up. I decided to do this as I want the belt drive lined up correctly by someone who has done it before and I would like Roy to make sure he is happy with how it all runs. I would hate there to be a niggling problem that could easily be solved if I had X, Y & Z at my disposal, which I probably wouldn’t.
And if there is any spare cash we may give it an hour on the dyno to see what it puts out…