Phillip Rashleigh has been sourcing parts for his scrambler special. Now he knows what he’s got, he just has to figure out how to fit it to the B31 chassis…
Enjoy more RealClassic Magazine reading every month.
Click here to subscribe & save.
Once I’d found the right pieces and got my project bike together in large lumps, it was time to tear it all down and start to build it back up in the usable form. I had made a few contacts in the Plymouth area who would be instrumental in getting the look I wanted.
Firstly there was the frame work. The bike had been converted for scrambles work, and the frame had been ‘modified’ to suit. The modifications had involved cutting off the rear footrest hangers, rear brake pedal stop bracket (God only knows why) and the left hand battery carrier bracket (but not the right hand one). There were also various drilled holes for race number plates and other holes where the chain had worn through the frame.
I’d planned to fit an alloy tank, a three quarter saddle and, if I could find one, a central oil tank. I managed to find and buy these items from various sources, which meant I had a tool box, oil tank and fuel tank to get rid of along with the original footrests, engine plates, 7-inch hub and a few other bits and bobs. Some were sold on eBay, others through the BSAOC and to be honest I got enough funds to cover the original purchase price of the bike — plus a few other parts as well.
|
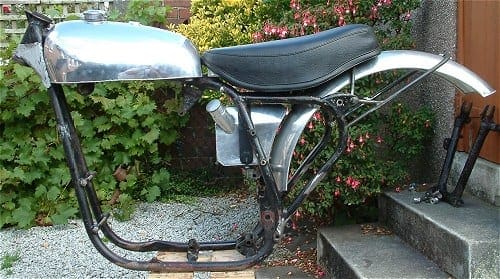
I took the frame, rear fender, oil tank table and a lot of period photos to ace fabricator Phil Betty in Plymouth. This chap races an old Bantam, and you can tell by the glint in his eyes that he shows no mercy to the bike or other riders. After a little discussion we decided upon a plan where he started by blending in what was left of the rear footrest hangers, welding up the chain damaged frame, added the central oil tank table, made up and welded in a stud for fixing the tank. The latter is a bit OTT perhaps but I think it is a lot more functional than BSA’s attempt. |
BSA B31 Stuff on eBay.co.uk |

Then to the piece de resistance — I was having trouble getting a rear fender support in the style I wanted. After a lot of talking and looking at period pictures he worked his magic by making a rear fender and saddle support bracket based on the BSA works bikes. We also decided to move the seat 50mm forward from its original position as it lined up better with the alloy tank and the works bikes seemed to have been modified in a similar way. I am sure this was to bring the rider’s weight forward to keep the bike level and to make the rear end a little more skittish.
Then the frame was blasted and epoxy primed and hand painted black as I knew there are at least two more brackets to weld on, but these can only be done when the bike is 95% built, and I am not too worried about the finish as I intend to use the bike for green laning (anyone in the Plymouth area up for this?).

About this time I bought the front and rear lights, but after a few phone calls and not liking the look of the rear light I have decided instead to build the bike for daytime road use only. Thus it needs no lights or electrics, just a number plate and bulb hooter horn to keep the feds happy — oh and a reflector if the MoT man is feeling picky.
While the frame was being worked on I kept the project’s momentum up by getting the wheels built with alloy rims and stainless spokes. I initially wanted to keep the original rim sizes as specified by BSA but the lack of 19-inch rear tyres in a knobbly pattern forced my hand and I have gone for 21-inch front and 18-inch rear.
The hubs were a simple clean up inspection and paint (kinda), starting with the rear QD crinkle hub. I found (as I was told to expect) loose rivets, so this was welded up painted and built up with new bearings. I had the bearings in and out of this hub about five times trying to work out how to get the right-hand side retaining cap to level up with the top of the hub, but managed it in the end. The front wheel was a simple clean up and replace the bearings job, however once built I noticed it was not centred in the forks. I was told this was always possible as all bikes are a little ‘different’. I had the wheel re-adjusted and was happy with the result.
Next time? Front and rear suspension. It’s no yoke…