Enjoy more RealClassic Magazine reading every month.
Click here to subscribe & save.
Dave Wooding’s saddle split and he didn’t want to pay top dollar for an inferior replacement. The solution was a leather saddle cover for less than a fiver…
Problem? The fabric cover on the new Indian-made single saddle split as I fitted it to my old Enfield. Gaffer tape made a temporary repair, but would I buy a new cover of this quality? No! A new Indian-made saddle costs £65 complete. A UK-made new cover would cost £42. I once had a big American style leather saddle from Hitchcocks. It was brown, had a matte finish and was excellent but I sold it with the bike. Another one I bought later was black but shiny and too slippery. This also got sold on. When I recently obtained another old Enfield, I fancied another brown saddle but none were available with the ‘matte’ finish.
|
So why not make my own? A short time spent on eBay provided me a piece of suitable leather, 620 mm square by 1.5mm thick, for a total of £4.30 including delivery, and it was brown and with a lovely matte finish. |
Bullets on : |
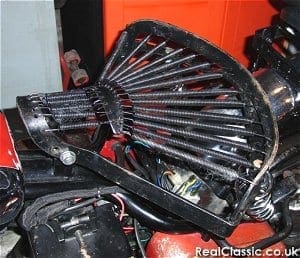
Removing the cover from the saddle took only a few minutes to straighten the thin metal holding strips and lift it off. The thin Rexene-type fabric cover was stitched through the thick felt pad which sat directly on the springs stretched across the saddle frame. Stripping the cover down and undoing all the stitching with a borrowed stitch cutter left me with patterns for all the component parts.

These were flattened with a steam iron between pieces of an old curtain. The top cover had a slit either side of the nose. The two sharp pointed vee pieces were to be sewn in as inserts (darts) to allow the forming of the saddle nose. The felt was similarly sewn and the two blunt-ended vee pieces were tack-stitched across the felt underneath to protect the stitches from the metal springs.
Marking the leather and cutting out the several pieces was easy. Perhaps the most difficult part was the strip making the rear ‘skirt’. This had been stiffened with card then glued and folded to overlap along the centre line. The leather was thick enough to not need stiffening and was glued using Bostik in the same way.
I had recently obtained a sewing awl and put this into good use for the first time. This is an ingenious tool having a tri-pointed grooved needle with the eye at the (very) sharp end. The needle is held in a hollow chuck with a spool of waxed thread passing up from the handle along the needle groove then through the eye.

Each time it is pushed through the fabric then pulled part way back it leaves a loop of thread for the loose end left on that side to be passed through before pulling it back out and tightened. Progress is made in the same way as a sewing machine, just a lot slower. It isn’t as secure a stitch as two needles one from each side passing through the same hole but is well up to the job.
The inserts were sewn in from the ‘wrong side’ of the leather before turning the cover over and locating it on the felt pad. A little time was spent to carefully fold the edges over the felt before holding them in place with large bulldog clips. As stitching progressed, these were removed.
Before the skirt was fitted, a reinforcing line of stitching was first marked out using a large plate and then sewn through the felt from the top, parallel to the edge 30mm in. The new rear skirt was stitched on first from the midpoint, all stitching being from the top for neatness as the underside tends to wander in the hands of the unskilled (mine). At this stage the stitches went through four pieces of leather as well as the 6mm felt. At the end of each run the thread was pulled though to the same side and tied.

The longest bit of stitching around the edges, starting from the mid point of the nose, was completed quite quickly before the final pieces covering the felt inserts underneath was tacked using an ordinary (big) needle.

Some care was needed to prevent the top curling up as stitching progressed while keeping the leather tight where it was folded over the edges.
The last things to be refitted after flattening with a hammer were the metals strips. The original bifurcated rivets had fractured in removal, being a one-use-only design. I would like to have used copper rivets and washers but had none. I vaguely remembered having some short bifurcated rivets from my apprentice days in the Sixties. I found them still in the old jam jar. Ten were needed: there were eleven!

Also, while on holiday some time ago, I bought a set of hole punches for a few quid. The smallest one was ideal and so the holes were successfully punched through on a wooden block. The rivets and strips were assembled to the cover and the rivets part opened with a small cold chisel on the underside before peening them fully over on a steel block.

Lastly, the nice soft leather needed treating with a suitable conditioner before refitting to the saddle frame on the bike.

Check out the various leather tanning methods and preservatives online. One suitable site is www.woodstockcustomleather.com. Vegetable tanned leather seems to be the most commonly type for this type of application. Mine is ex-Laura Ashley and could have been for a posh coat!
How much did it all cost?
Time?
Worth it?


